
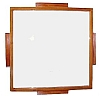
Build Your Own Domino Top
Instructions to Help You Learn to Build the Tabletop
Use these instructions and pictures to see how to build your own Domino Top
| Material / Equipment | Size / Amount / Quantity |
| Wood (for sides)
1" x 3" x 24" (double six top) 1" x 3" x 26" (double nine top) |
4 |
| Top panel 1/4" plywood
24" x 24" |
1 |
| Formica®
24" x 24" |
1 |
| GRR-Ripper® Adjustable Push Block | 1 |
| Table Saw | 1 |
| Dado blade | 1 |
| 1/4 Sheet Sander
We used Bosch and highly recommend it. You can read about our experiences with ¼ sheet sanders here. |
1 |
| Sandpaper | 180, 220, 400
as needed |
| # Router
to round over the top edges if desired |
1 |
| Contact Cement,
wood glue, screws |
1 |
|
# Belt Clamp
(Just works best) |
1 |
I apologize if these instructions aren't quite what you were hoping for, but this is a one person operation now and that one person is a retired lady doing her best to help people build the tables that used to be made by Premio. This information is free and I have tried to make it as complete as possible, but we never used a set of plans for our tables. If plans existed I would have put them online to share with you rather than going through all this work... Everything was cut according to our own setups. If everyone out there had the same equipment that we used here it would be a lot easier. If the tables were made of a material that was always uniform and had a specific thickness it would be easier. The wood you buy in Florida is not necessarily the same as the wood that is available in New Jersey so you need to use your own experience and judgment in deciding some of the dimensions such as the width of the dadoes. While I am happy to answer questions, I do hope I've set out the information so that it is useful to as many people as possible.
Some of the terms used to refer to the parts and steps of construction and finishing may be unfamiliar to you, please don't hesitate to ask questions, that will help me put the answers here to help other people also.
I can not tell you where to buy the materials to build your top, you will need to consult your local businesses such as lumber and hardware stores. I cannot guarantee your success either, this is only a guide for those who wish to build their own domino top. You need to know your own abilities and limitations, how to use your equipment to achieve the results you want.
The GRR-Ripper® Adjustable Push Block is one piece of equipment that I would not use a table saw without. It professionally guides your work over the blade in complete safety. If you value your fingers (and have had enough of flying kickbacks with featherboards) you should have a GRR-Ripper before you cut your next piece of wood or use a router table. I cannot cover all the benefits of this terrific safety equipment here, but once you use one you'll never go back to any other kind of push block or featherboard again. It is easily worth 3 times the price just for the safety and versatility features alone.
Line drawings are not to scale, use the measurements listed in the tables with the instructions. Line drawings are only to show details that cannot be shown using photos.
Have Fun and Good Luck! --Nancy
Get information and help in finding the right ideas and tools for your woodworking projects today!
Suggestion: Read all of the instructions before you start so you will know how/what/why before you get to each step. That way there are no surprises.
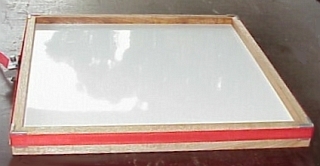
The first step is to build the panel that will be the playing surface. Coat the top of the plywood and the back of the Formica® with contact cement. You can use a brush or a scrap or wood or a handy tool used to apply tile adhesive. We always used the tile adhesive tool because it is fast and easy to get excellent even coverage all over both pieces. When both pieces are dry, very carefully place the two glued sides together, being careful to line them up - you only get one chance because once the two surfaces touch, it can tear the Formica® if you try to reposition it. It helps for this step to have an assistant to help you lower the Formica® exactly onto the plywood. When they are lined up, apply hand pressure to smooth down the Formica®, then use a piece of scrap lumber and a hammer to get all the air out and form a perfect seal between the two pieces. Move the scrap wood around the top, hitting it with the hammer to apply pressure to all of the top. This panel will be trimmed later to fit the top sides before they are assembled.
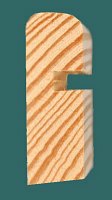
Here you see the cutaway profile of a top side showing the slots (dadoes) cut where the panel that will be the playing surface is inserted, glued and clamped overnight.

Here you see how the slots (dadoes) were cut in the sides of a domino top, this is where the panel that will be the playing surface is inserted.
Before cutting the topsides to their length or cutting the mitered corners you will want to cut the dado where the playing surface panel will go. The thickness (width) of the dado should be just very slightly (1/32" or less) wider than the thickness of your panel. Since different brands of laminate and plywood vary widely I cannot tell you what size the dado should be. Measure the thickness of your panel and cut the dado to that width plus 1/32". Test mount your panel for fit in the dado before continuing to either roundover or miter the top sides. The fit should be snug but not so tight as to require force to enter the dado. When you get ready to glue it together, the glue will help it slide a little, but it will also take some of the available space. The dado should not be loose or you will need to shim it up from below when you glue it in place.
Note the use of the GRR-Ripper® to easily guide the top side over the dado blade on the table saw as shown here.
Something New! GRR-Ripper makes a sweet little tool called the FitFinder to accurately measure your setups without math!
Some people prefer the flat square top edges are just sanded smooth. Others prefer the more finished look of a round top corner. If you want the top edges to be rounded, this is the time to do that, before the top sides are cut to length. The radius you choose is entirely up to you, from a slightly rounded flat top edge to a very rounded edge, anything goes, as long as they are all done the same. The finished outside length of the top sides for a double six top is 22 1/2". For a double nine top the finished outside length of the top sides is 24 1/2". You can make your top side any length you want, so long as your panel will fit the space you are creating. You need to cut a 45° angle corner where the ends of the top sides will be joined. The inside length of your top sides depends entirely on the thickness of the wood you have selected so it is not specified here. To make the corner cuts your wood should be straight, flat, dadoed and rounded over (if desired). The accuracy of your angle cuts will decide how professionally your top will fit together.
Once your corners are cut so that the outside length of the top sides is correct and your angles are true 45° cuts you are ready to begin sanding and finishing. The best tips I can give for sanding, especially rounded surfaces is to avoid using hard sanding blocks. You can get a sanding mat which is a large padded fold-up type of pad, where you can work at machine or hand sanding without having your work sliding away. When you're finished, shake the dust out and fold it up for the next use. I cut little squares out of this padded material to use for hand sanding between my hands and the sandpaper. It keeps your hands away from any hot spots the sandpaper can get when you have a lot of hard wood to sand, and it keeps the sandpaper securely controlled.
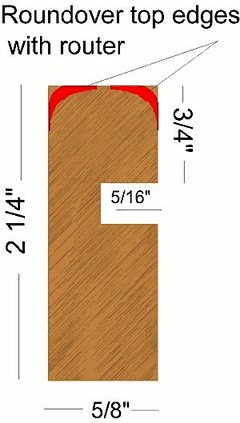
Here you see a cross section cutaway diagram of a top side showing measurements. The thickness of your wood and the playing surface panel determine some of the measurements. Your measurements may vary.

Here you see a cross section cutaway diagram of a corner showing how the corners are screwed together after the glue is dry. One screw is high on the side and the cross screw is lower.
The next step is to set up the top sides on your work surface where they will sit after being glued. Work on a well lit flat surface large enough to hold your work comfortably and give you room to move around it freely. Clamp the top sides snugly in position without the panel in place to get an accurate measurement. You need to measure straight across the table top to get the size to cut your playing surface panel. Add 3/8" to that measurement and double-check in both directions. This is the finished size to cut your panel. Make sure the topsides are going to fit together the way they should before proceeding. Check to see that the dadoes meet on each inside corner or you will have trouble fitting the topsides together properly. Make sure the panel fits nicely inside the dadoes, snug, but not tight. After measuring, unclamp the top. The sides are now ready to begin sanding and finishing.
Prepare the Top's SidesWhen your sides are miter cut and rounded and fit is checked, wet the wood down and let it dry overnight. This stands up the grain so that it is ready to sand. Once the panel is glued in place you cannot sand or stain the inside edges or you'll risk damaging the playing surface. The inside edges of the top sides must be sanded to at least 320 grit before you apply the first coat of stain. Whether you choose to use a waterbased stain or the traditional stains, you just need to follow the instructions. On noble woods such as cedar and mahogany we do not recommend the use of waterbased stains, their color durability is not suited to the quality of the wood.
Let the stain dry thoroughly and sand once more, this time down to 400 grit for a satin smooth finish. Wipe the dust off between coats. After the second coat of stain is dry apply a sealer. Lightly smooth that coat with the finest steel wool you can get and wipe it clean. Now your top will be ready to add the playing surface and glue together. The inside edges should be completely finished at this point, including varnish if you are finishing your table with varnish. After it is solidly glued and screwed together the outside edges will get the same finishing treatments so you will want to finish the inside edges high enough to the top (or even a little over the top) to be able to blend in the finished and unfinished areas to the same color and finish.
Your panel is cut to size now, your top sides are finished completely on the inner side, now to assemble. Before opening the glue, lay out the parts and try the playing surface panel again. If you are satisfied with the fit, lay the top sides down in formation on the work surface with the dadoes facing up. Keep a damp cloth and paper towels at hand in case the glue does not behave as planned. The specific glue recommended above allows about 10 minutes of work time, if you are using another brand of glue, be sure you know how long you have before the glue begins to set as occasionally the top will be difficult to fit together. Sometimes an uneven panel of plywood needs to be sanded smooth on the edges to fit nicely into the dadoes. This is why I recommend that you try the fit before adding any glue.
Ready? OK, add enough glue, only in the dadoes so that the edges of the panel will easily contact the glue, but not so much that it oozes out, or you'll have a mess to clean up. Fit the panel (facing you) into the dado of the top side in front of you, then reach across and fit the panel edge into the opposite side. One at a time add the other sides and be sure they are straight and tight before you clamp them.
Square the top up before the glue sets, measuring across the top diagonally from corner to corner to be certain that the corners are square. The belt clamp will hold them in the position they are in, but will not tighten them very much, so you don't want any corner gaps when you add the belt clamp. If you are using some other type of clamp, follow the general directions here and apply your clamp(s).
Get Your Belt Clamp today
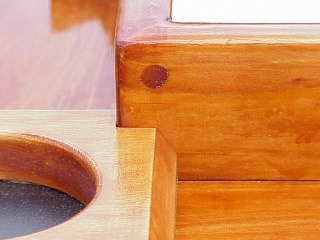
A finished Corner to Show the Screw Placement
Here is a closeup of a finished corner, showing the dowel plug used to fill in the countersunk screw hole. We used black oxide finish screws 6x1.25
After allowing your top to dry completely (overnight is best), remove the clamp and screw the corners. One screw in each direction holds the top securely. We always used a countersink to hide the screws under a piece of dowel inserted and glued into the screw hole. Each corner should have two screws, one from each direction. (See the picture and diagram)
Set one screw higher than the other to allow them to hold different sections of the wood. Whether you use decorative plugs or dowels to fill the screw holes or leave the screws showing on the surface is up to you, but if you do use decorative plugs, do not add them until the top is finished, because you need to sand and finish the outsides of the top and they will make sanding the corners difficult.
Follow the same steps as you did to finish the inner sides of the top sides and your top will be ready to add the racks. That is covered in the How to Make Your Own Domino Racks section, a (non-automated) slideshow of pictures and descriptions.
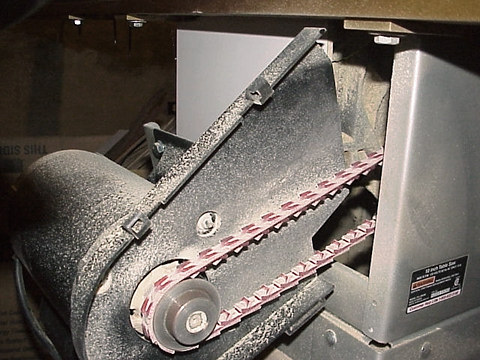
NOTE: MOST table saws have blade wobble that can affect the accuracy of your cut. If you take a good look at the cuts your saw makes, you may see the saw marks, the swirls on the wood that result from the blade wobble to show you how badly your saw wobbles. We added a v-link belt to the saw drive to lessen the wobble of the saw blade. The difference is impressive and I can't think of any more useful adaptation you can add to your table saw to significantly improve the quality of all your cuts. The same belt material can be used in your drill stand and other belt driven tools.
Removing the OEM saw belt and replacing it with this V-Link Belt made a world of difference in the amount of sanding needed to smooth cut pieces. Where there used to be saw swirls to sand out, the cuts came out needing almost no sanding. It cured the belt wobble built in to the saw.
The manufacturer claims a 35% reduction in vibration which also means less noise. I can't measure it myself but I would agree that we got at least 35% less vibration with this belt. - (update - this belt was added nine years ago, the saw is used less today, but that same belt is holding up just fine so far. Well worth it!)
A 4 ft x 1/2" V belt is about $25.00"
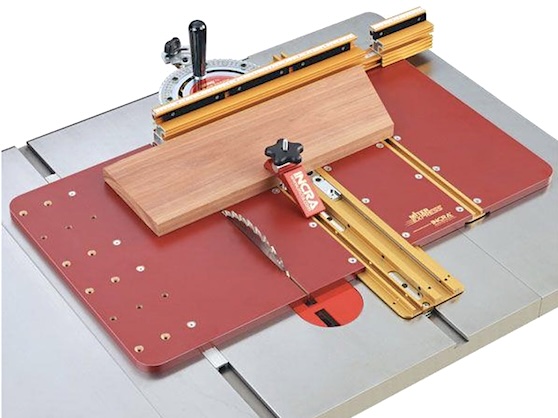
MOST standard miter cutting guides that come with your table saw are nowhere near accurate. If you are only building one table you may not have or want the equipment required to make a proper miter cut. As long as you are aware that your results depend on your equipment and are not willing to accept "close enough" results you should consider getting a good miter gauge for your saw. A miter gauge attached to a sled can be set up and ready to use in about a minute or less. We used Incra miter gauges and accessories, and recommend them highly - they will give you perfect results.
The Miter Sled is an advanced accessory that lets you dial in the precise angle for a cut and have repeatable accuracy on multiple cuts. It slides onto the saw table, handles simply for perfect cuts that make joining corners a simple job. The Miter Combo Value Pack is a downsized version of the one we used. Just as accurate, but less than half the price of our full sized Incra Miter Sled.
IF you use these links to order, I will earn a small commission. This does not change the price you pay, it costs the same whether I am paid or not. I tell you this because I am recommending some products here and the FTC requires that I tell you. PS - You may notice we have no ads on this site and your help is highly appreciated!
For our friends who'd like to "do-it-yourself"
Find the perfect legs for your tables for any table design!
Home of Premio® Domino Tables
copyright© 2001 - 2026 dominotables.net all rights reserved.
use of this site indicates your acceptance of our policies
more information in our privacy policy
